ClevGuard Support: Monitor Devices with Others' Permission.
How do I properly free up space on Android phones? Android tends to consume the internal memory, even in new phones. How to clear better?
I believe that many users are troubled by the above problem.
There is going to be a time when your phone will refuse to install new apps or download files due to lack of storage space. A phone's storage space can not only be occupied by apps and media files but also by junk and temporary files left behind by apps and OS.
In this article, we will illustrate all the different methods on how to free up space on Android. There is also an amazing app which not only protects your phone from spyware but also cleans up junk instantly for you. Now, let's get started!
- Method 1: Free Up Space on Android Using a Junk Cleaning App
- Method 2: Clear Space for Individual Apps on Android
- Method 3: Clean Up the Browser Cache
- Method 4: Back Up Your Files in the Cloud to Save Space
- Method 5: Free Up Space Through Manage Downloads Folder
- Method 6: Free Up Space on Android via Transfer Data to Micro-SD Card
- Method 7: Go for a Factory Reset on Your Device
Method 1: Free Up Space on Android Using a Junk Cleaning App
The easiest way to clean up junk and free up space is by using a junk cleaning app. There are various junk cleaning apps available, but we will recommend your ClevGuard Anti-Spyware due to its features and versatility. The app is available for Android users.
Steps to Install ClevGuard and Free Up Space
Step 1: Click the button below to download ClevGuard app at the Google play store. This app is quite simple to use.
Step 2: Open the app and go to Junk Clean tab at the bottom.
Step 3: On the next screen, tap on ‘Try It Now’ button.
Step 4: Make the selection depending on which junk type you want to clean as well as the apps whose junk you want to free up.
Step 5: Finally, tap on Clean button to finish up cleaning.
Advantages of ClevGuard Anti-Spyware
- Deep Cleaning - With a few taps, you can clean up junks such as app cache, APK files, residual files, thumbnails, ad junks, and empty folders. Therefore, the cleaning up process is going to be in-depth so that more space gets free.
- Selective Cleaning - You can select the app whose junk you want to clear. There are many apps whose cache you may not want to delete. This is among the only few apps that let you make the selection as per requirements.
- Important Features – Apart from junk cleaning, the app protects your phone from spyware. You can scan and detect spyware and hidden apps present. You can also turn on real-time protection. Moreover, you can find out email data breach incidents for your email address as well as check the risk associated with any app.
This is the simplest way on how to clean Android phone internal memory. This is because you are cleaning up with the help of an app which is always going to be easy. However, if you want to clean up your phone manually, the following are the methods.
Related Read: Speed Up Your Android Phone [100% Work]
Method 2: Clear Space for Individual Apps on Android
You can always clean up your Android phone's junk data manually. However, it is a very tiring and time-wasting process because your phone must have many apps installed. When you are getting a junk cleaning app for free, there is no need to clean up space for individual apps.
Anyway, here are the steps for manual clean-up of every app's junk data.
Step 1: Open Settings app on your phone.
Step 2: Tap on Apps option. You will see the list of all apps installed.
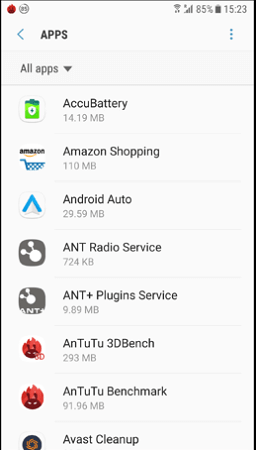
Step 3: Tap on any app whose junk data you want to clean.
Step 4: Tap on Storage option. Just below Storage option, you can see how much MB of space the app is taking on your internal storage.
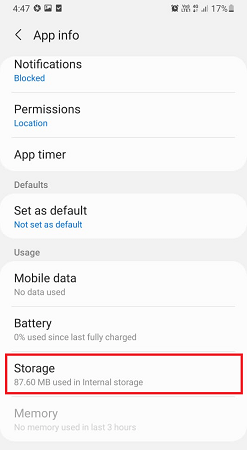
Step 5: Tap on Clear Data or Clear Cache option as applicable.
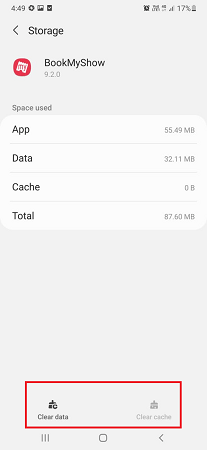
Continue the process for all apps whose data and cache you want to clear. Instead of repetitive and time-consuming effort, you can simply use ClevGuard app to remove junk and cache data easily for every app by selecting them together.
Method 3: Clean Up the Browser Cache
Apart from the usual junk on our Android smartphone, browser cache takes up sizeable storage space. You need to clean up the browser cache from time to time to free up the space as well as prevent any data breaching incident. Most Android users prefer Google Chrome as their default browser. Here are the steps to clean up browser data on Chrome.
Step 1: Open Chrome web browser.
Step 2: Tap on the three-dot icon at the top-right corner.
Step 3: Tap on Settings option from the drop-down menu.
Step 4: Tap on Site settings option under Advanced section.
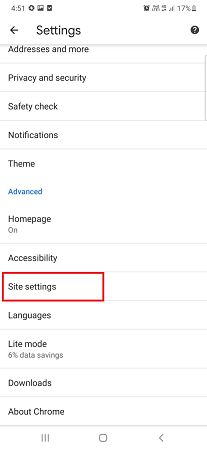
Step 5: Tap on Data stored option.
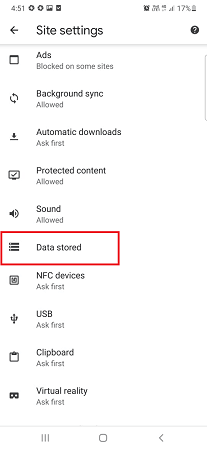
Step 6: On the next screen, tap on Clear all data option at the bottom on the screen.
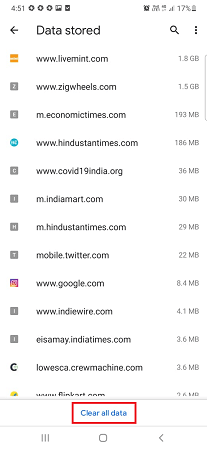
Cleaning up browser data will free up only a couple of hundred megabytes of space. Therefore, cleaning up browser cache is not that effective in comparison to cleaning up phone junk. Besides, some websites will take time to load as their cache is cleared.
Method 4: Back Up Your Files in the Cloud to Save Space
More than app data and regular junks, photos and videos take up maximum storage space on our phones. There are also various important files we download from the internet that can take up significant space.
Instead of storing them on your phone, you can easily take back up of these files in any cloud storage space. This is a more logical approach on how to free up space on my Android phone.
Thereafter, you can free up space on your phone by deleting them. When you need to access the files, you can go to your Cloud account to check them out.
For Android users, Google Drive is the most popular Clouds storage platform. The app comes pre-installed on most Android smartphones.
Steps to Back Up Files on Google Drive
Step 1: Open Google Drive app on your phone. If not pre-installed, install it from Play Store.
Step 2: After opening the app, sign in with your existing Gmail account.
Step 3: Tap on the ‘+’ icon at the bottom-right corner.
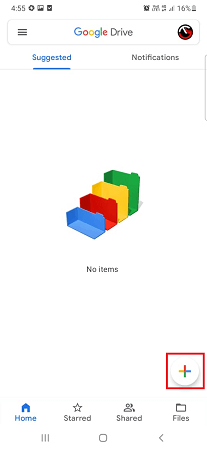
Step 4: From the pop-up menu, tap on upload option.
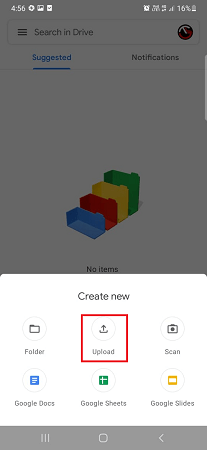
Step 5: Select the files from your storage which you want to take back up. Continue the process till all the desired files are uploaded.
Google Drive offers 15GB of free space. Apart from Google Drive, you can use Dropbox and OneDrive, but their free storage space is comparatively less.
Method 5: Free Up Space Through Manage Downloads Folder
There are times when we download certain files just to check them out. However, we forget to delete them, and they keep piling up in the Downloads folder.
Sometimes, there are certain files and photos that get downloaded automatically, and they do not get deleted automatically. This leads to useless waste of storage space, and you need to take the following steps to free up the space.
Step 1: Open the My Files or File Explorer app on your phone.
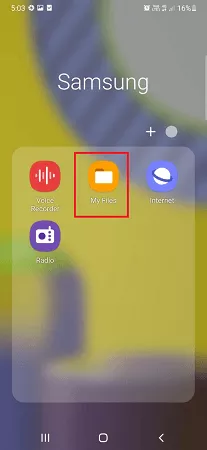
Step 2: Tap on the Downloads folder. You will see the list of all files inside the Downloads folder.
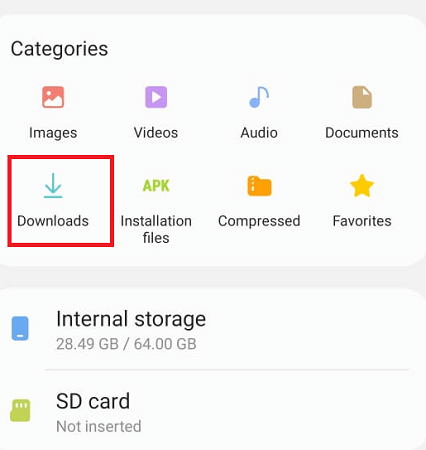
Step 3: Tap and hold and select the files that you want to clean.
Step 4: Finally, tap on Delete option.
This alone will not clean up signification space unless you have some large file. Therefore, you have to try out the other methods manually or use a junk cleaning app like ClevGuard for significant freeing up of space.
Method 6: Free Up Space on Android via Transfer Data to Micro-SD Card
If you are not comfortable with moving your important files to a cloud storage platform for personal and security reasons, you can move them to a micro-SD card. In fact, the most recommended way on how to free up space on Android phone is through a Micro-SD card.
That is to say, you can use multiple micro-SD cards to move your important and large files and get the files readily by inserting the card into the slot.
Step 1: Insert a micro-SD card that is supported by your Android phone.
Step 2: Open My Files app or File Explorer app on your phone.
Step 3: Tap on Internal Storage. You will see different folders containing different categories of files like photos, videos, downloads, music, movies and likewise.
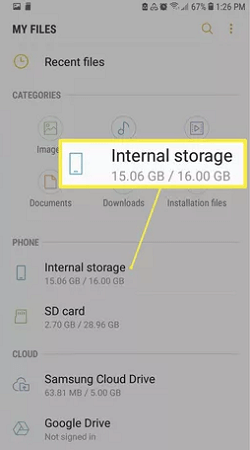
Step 4: Select the files that you want to move from internal storage to micro-SD card.
Step 5: After selection, tap on Move option.
Step 6: Then go to micro-SD card and tap on Move Here option.
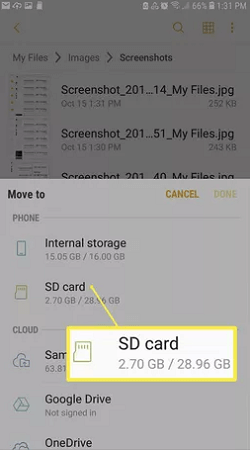
These options may vary slightly depending on the File Explorer app you are using and therefore, adjust accordingly.
Method 7: Go for a Factory Reset on Your Device
Even though we do not recommend the Factory Reset option, there are times when performing a factory reset becomes a necessity. Factory reset means your device's data will be wiped out completely, and it will return to the same state when you first unboxed it. All apps will get uninstalled, and all phone data and files, including photos and videos, will be deleted. Here are the steps to perform a factory reset on your Android device.
Step 1: Open the Settings app.
Step 2: Tap on General Management.
Step 3: Tap on Reset option.
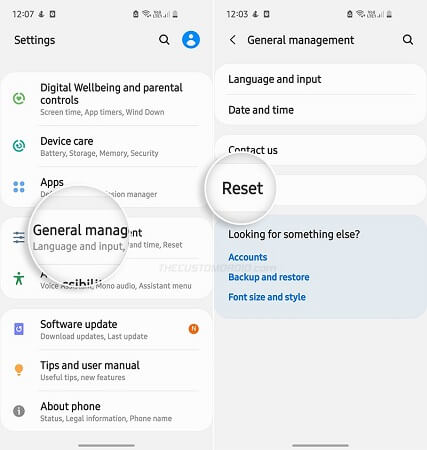
Step 4: Tap on Factory data reset option.
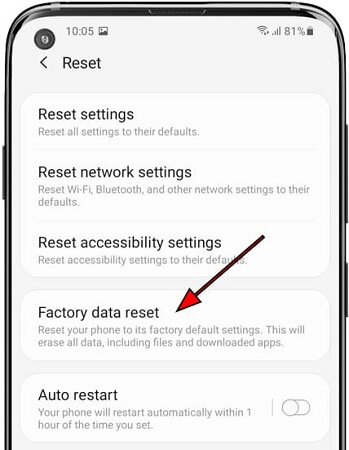
Step 5: Confirm by tapping on Reset Device option.
Step 6: Finally, tap on Delete All button.
You should only opt for this method when all other methods are not working for you. Otherwise, strictly stay away from it as all phone's data will be lost.
Summary
Hopefully, you have understood how to free up space on your phone. You can try out all the different methods we have mentioned. However, practically speaking, you will not get time to perform or you will not remember all the methods. That is why we suggest you to install ClevGuard Anti-Spyware to clean up junk easily from time to time with a few taps. Besides, use the app for the complete protection of your Android phone.


