ClevGuard Support: Monitor Devices with Others' Permission.
A six-year-old boy secretly spent over $16,000 on his favorite video game, Sonic Forces, in Apple App Store, leaving his mom in shock.
Are you shocked when you hear such news? This, however, is not a joke, it is a true story that happens in our real life!
Given the popularity of phones and phone games, nowadays, we hear such news from time to time. That is why Apple allows parents to create an Apple ID for their kids with limited access to services.
Furthermore, it introduces the Family Sharing feature, which allows you to manage your children's Apple IDs. You can grant access to important apps while blocking access to those that aren't intended for them.
In this article, we will show you how to create an Apple ID for a child and set it up perfectly. However, the Apple Family Sharing feature has some significant limitations, which can be avoided by installing KidsGuard Pro for iOS.
- Part 1. What Does Child Apple ID Include [Content/Advantages/Limitations]
- Part 2. Step by Step to Create A Child Apple ID
- Part 3. The Best Way to Keep Track on Your Child's iPhone
1. What Does Child Apple ID Include?
Following the trend of online studying and learning, most parents are giving their kids smartphones or tablets. However, Apple does not allow kids below 13 years of age to create their own Apple IDs for all the right reasons. Instead, Apple has introduced a new feature called Family Sharing whereby parents can create a new Child Apple ID and have full control on their child's Apple ID.
Content Of Child Apple ID
The new Child Apple ID that you create for your kid will contain all their Apple content. The following are the useful items that come under Apple content.
Apple Books – Apple Books is the best destination for kids to access any available book in digital format and do self-studying. The library is vast, and it comes with a reading mode, read list, and instant page access features.
Apple Podcast – Podcasts are a great way to learn things from experts in audio format. There are millions of shows, and some are them are informative and educational for kids. Parents can share their subscribed podcasts with their kids for educational purposes.
Apple TV – Movies and TV shows are quite popular among kids from an educational as well as an entertainment standpoint. Parents can subscribe to any movie or show that they think fits their kids and share with their child Apple ID for kids to access them.
Apple Music – Learning through music and music for entertainment as well as relaxation are important. Hence, parents can share Apple Music with Child Apple ID for all the right reasons.
iCloud Storage – iCloud is the best place to take backup of data starting from photos, videos, and messages to documents, emails, and calendars. Moreover, one can save passwords as well as contacts. Parents can share their iCloud storage with their Child Apple ID to backup any data.
Advantages of Creating Child Apple ID
Share and Hide Content – The main advantage of creating a Child Apple ID is to exercise parental control. You can share with your child the apps that they required and hide all the rest to avoid distraction and going astray.
Screen Time – You can enable Screen Time feature on your Child Apple ID so that you can monitor which apps he is using and the frequency and duration of each of the used apps. This will help parents to identify the distracting apps and limit their usage going forward.
Purchases Sharing – Family Sharing allows the parents to share any purchase they have made from App Store. This could be a gaming app, educational app, and likewise. Apart from apps, any other purchases like music and movie purchases, podcasts, and apps subscriptions can be shared with kids under Family Sharing.
Ask To Buy – When you enable this feature on your Child Apple ID, your approval will be required for any purchase or subscription that your kid wants to make on App Store, Apple Books, iTunes.
Location Sharing – You should enable this feature in order to track your child's cell phone location in real-time through Find My and Messages app.
Limitations of Child Apple ID
Before you learn how to create a child Apple ID, you should know about the limitations and the way to overcome the limitations.
Deletion Restriction – Once you create a Child Apple ID, you cannot delete or remove it from your Family Sharing group unless your kid turns 13. However, you can transfer the ID to a different Family Sharing group.
Monitoring Restriction – The biggest limitation of Child Apple ID is that you cannot create a Child Apple ID if your kid is above 13. In that case, you have to create a separate Apple ID for your kid, and he/she is likely to have full access without any parental control.
Therefore, if your child is over 13 years of age, we recommend you install the best parental control apps like KidsGuard Pro for iOS for complete parental monitoring and control for all the right reasons.
Part 2. Step by Step to Create A Child Apple ID
Let us now focus on how to create a new Apple Id for child under 13 for parental monitoring and control.
1. Getting Started Family Sharing
If you are going to use Family Sharing feature for the first time, take the following steps. Else, you can skip this section and go to the next "Creating Your Child Apple ID" section.
Step 1: Go to your iPhone's Settings app.
Step 2: Tap on your Profile name.
Step 3: Tap on Set Up Family Sharing option.
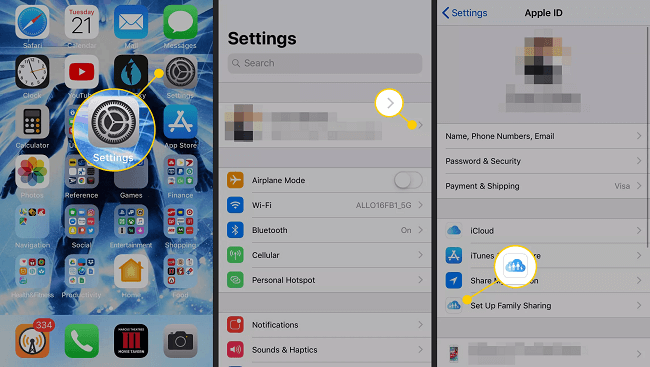
Step 4: Then tap on Get Started button. This is only applicable if it is the first time you are setting up Family Sharing feature.
Step 5: Tap on iTunes & App Store Purchases option.
Step 6: Finally, tap on Confirm button.

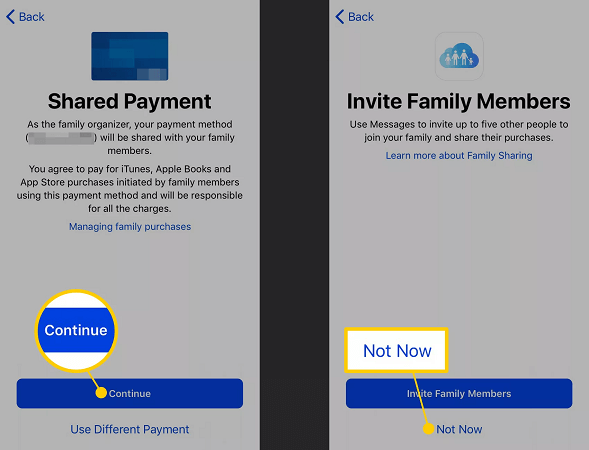
Step 7: Then, you will be asked if you want to share the same payment method associated with your Apple ID. If yes, tap on Continue button.
Make sure that you have set up the payment method for your Apple ID beforehand. If not, go to Settings, tap on Profile name, and tap on Payment & Shipping option. Tap on Add Payment Method and add a credit or debit card.
Step 8: On the next screen about Invite Family Members, tap on Not Now button.
2. Setting Up To Create Child Apple ID
Step 1: Take your iPhone or iPad and go to Settings app.
Step 2: Tap on your Profile name.
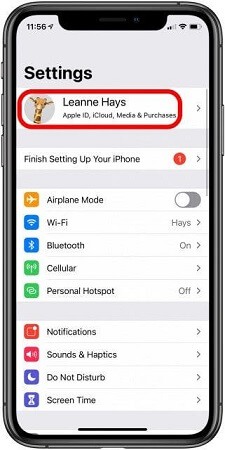
Step 3: Tap on Family Sharing option.
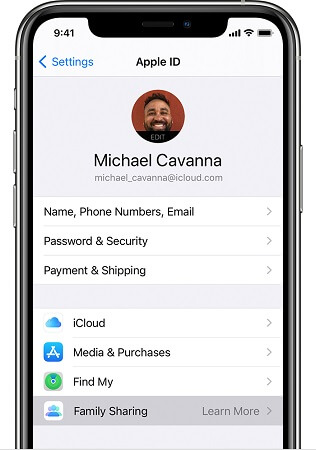
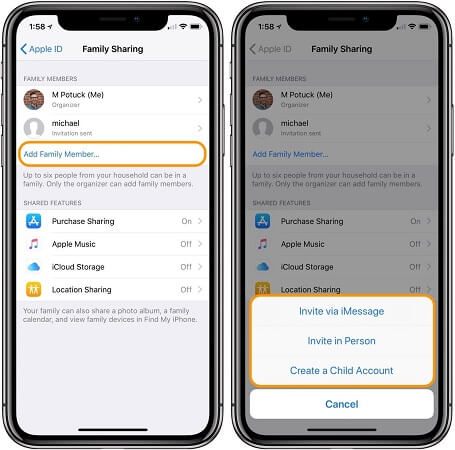
Step 4: On the next screen, tap on Add Family Member option.
Step 5: Tap on Create a Child Account option. Then read the on-screen instructions and tap on Next option.
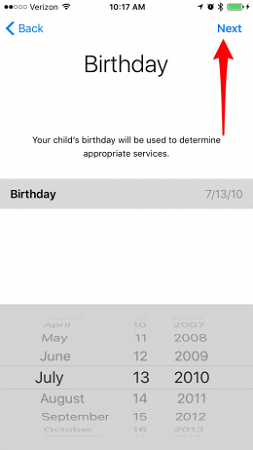
Step 6: Now, you have to select your child's birthday and tap on Next option.
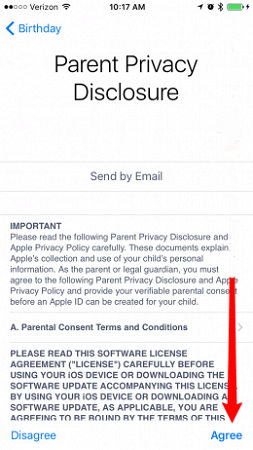
Step 7: On the next screen, read Parent Privacy Disclosure instructions and tap on Agree option.
Step 8: Now, you will be prompted to enter the CVV code of your credit card that is associated with your Apple ID. Then tap on Next option.
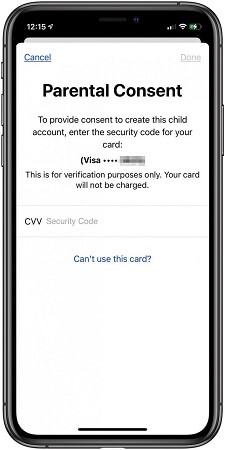
3. Creating iCloud Account and Child Apple ID
Step 1: You have to enter your child's name. On the next screen, you have to enter a new iCloud email address to associate with the new Child Apple ID as well as the new iCloud account. This step is about how to create an iCloud account for a child.
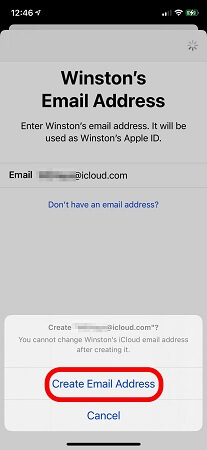
Step 2: Confirm that you want to use the iCloud email address to create Child Apple ID by tapping on Create option.
Step 3: Now, you need to create a password for your Child Apple ID. Make it easy so that your child can remember it.
Step 4: Set three security questions that will be useful in case you or your child forgets the password.
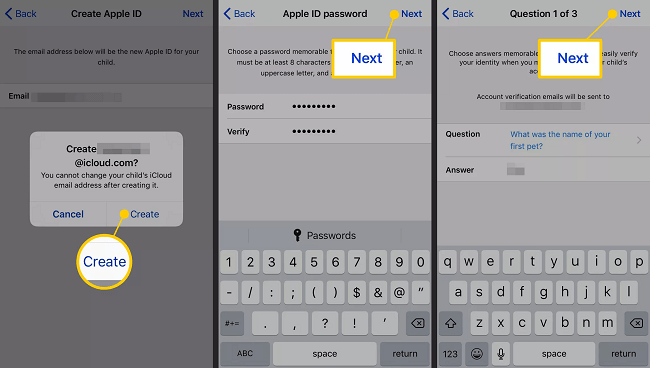
4. Setting Up Child Apple IDM
You will be seeing your Child Apple ID under Family Sharing. You can tap on it and set it up. On the next screen, there are many features like Ask To Buy, Location Sharing, Screen Time, Purchase Sharing, and even iCloud Storage sharing. You can tap on each one of them and turn them on by toggling them on.
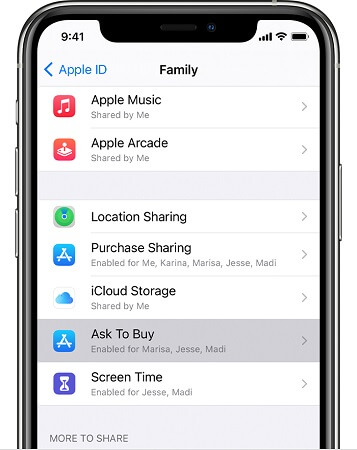
Apart from these, you can choose which apps you want to share. These are all the steps on how to set up Child Apple ID successfully. The steps can vary slightly depending on which iOS version you have on your iPhone. Follow the on-screen instruction to understand what exactly to do.
Part 3. The Best Way to Keep Track on Your Child's iPhone
Even though Child Apple ID is a necessary step to control and monitor your kid's iPhone activities, it is not the perfect way to monitor your kid's phone. This is because you can monitor with Child Apple ID if he is above 13 years of age. You also cannot track your kid's iCloud account even when you control your Child Apple ID. An iCloud account is where every iPhone user stores their contacts, messages, media files, location and browser history, and all the activities on their iPhone.
The best way to monitor your child's phone is using KidsGurd Pro for iOS. Here is the list of features that make KidsGurd Pro for iOS the best app for parental monitoring on kids of any age.
Features Of KidsGuard Pro for iOS
Monitor Target's iCloud – iCloud is where every iPhone user stores their phone data. Phone data include call logs, messages, contacts, social media chats, media files like photos and videos, browser history, location history, calendar, emails, and much more.
Therefore, if you can monitor someone's iCloud account remotely, you can monitor almost all past activities on his iPhone. KidsGuard Pro is one of the few legitimate apps in the market that let you monitor anyone's iCloud account.
Monitor Social Apps – Kids are highly active these days on social media apps, especially on adult social media where bullying and other inappropriate activities are rampant. This is where parental monitoring and guidance are crucial. Therefore, with KidsGuard Pro, parents can keep a close eye on all the activities their kids are doing on almost all the popular social media apps.
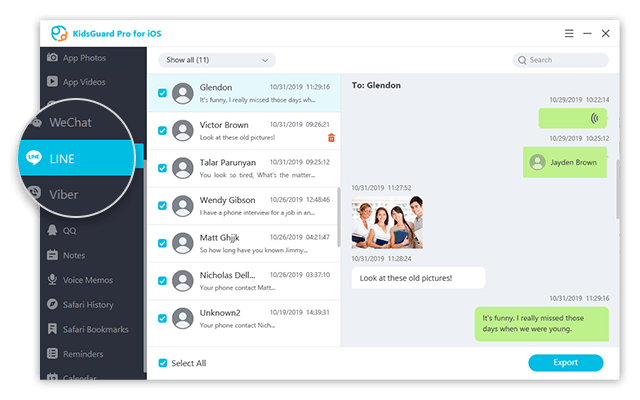
Check Deleted Files – One of the amazing features of the app is that you can also check out the deleted files by the user. Kids generally delete photos and videos that they do not want their parents to see. With KidsGuard Pro installed, there is no escaping.
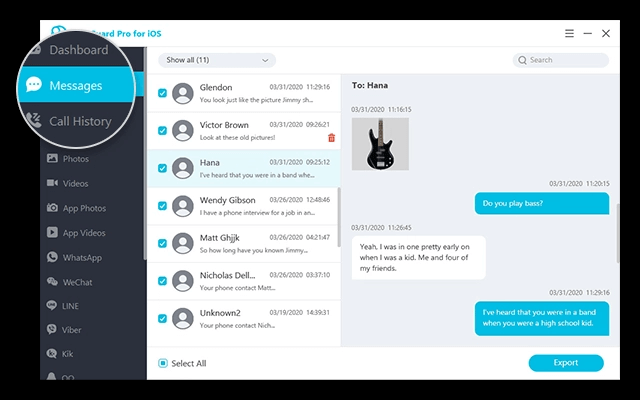
Calls and Messages – You can check contacts, call logs, as well as messages from your kid's iPhone. You can conclude with whom he is keeping contact.
Photos and Videos – You can monitor all the photos and videos they are taking with their camera, receiving and downloading through the internet.
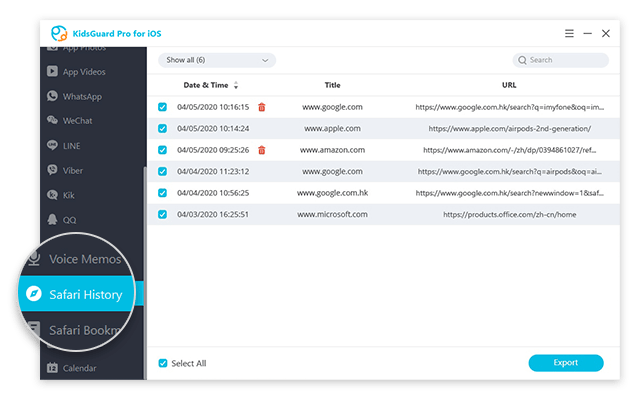
Browser and Location History – You can check Safari browser history and understand what your kid is surfing on the internet. Similarly, you can check his location history to understand his whereabouts.
Apart from these, you can check on notes, calendar, reminders, and other documents on your kid's iPhone with KidsGuard Pro installed. Most importantly, you do not have to jailbreak the target's iPhone to avail all these features. Moreover, deployment and installation are easy and only take a few minutes.
How To Monitor Target's iPhone Data with KidsGuard Pro for iOS?
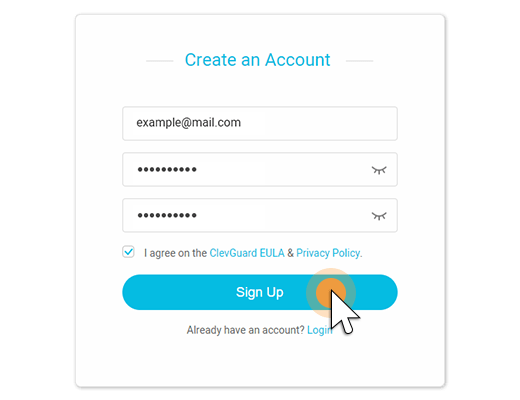
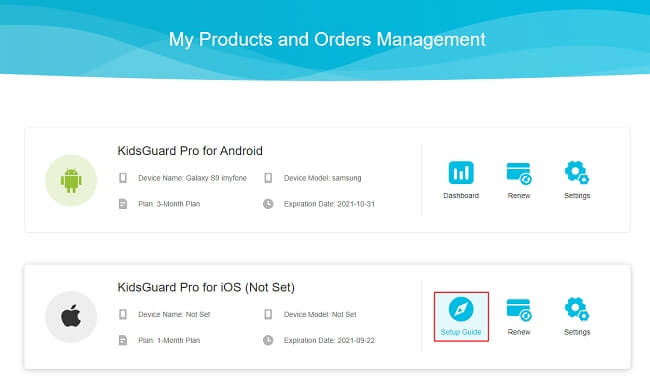
Step 1: Create an account with email address and password. Thereafter, purchase a suitable plan. After purchasing is over, you will get redirected to My Products and Orders Management page.
Step 2: Click on Setup Guide option to understand the steps you need to take to deploy KidsGuard Pro and start remote monitoring.
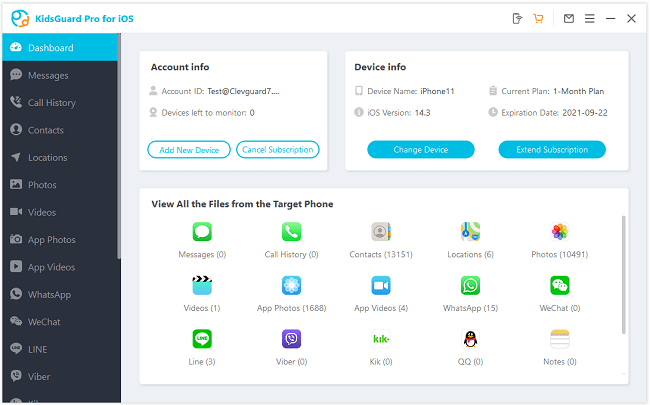
Step 3: Download the app on your computer following the on-screen guide and star monitoring on the dashboard.
Conclusion
Hopefully, we have answered your question on how to create and how to set up Apple ID for child. Your Child Apple ID will be ineffective for parental control and monitoring, if your kid gets above 13. That is why you need a proper parental monitoring and control app. We recommend you to install KidsGuard Pro for iOS for monitoring your child's iCloud data, locations, media files, social media interactions, calls, messages, browser history, and much more.


