ClevGuard Support: Monitor Devices with Others' Permission.
Welcome to the digital age, where safeguarding your computer's sensitive infomation is a must. Unauthorized access is like an open door for data breaches and all sorts of security headaches. If you're wondering how to check computer login history on Windows 10 and 11, we've got you covered without any complicated tech talk.

Let's talk about MoniVisor—a handy tool made just for folks like you. It does the heavy lifting by tracking every time someone logs into your Windows device. No need to stress; MoniVisor is like your personal security guard.
In this guide, we'll show you two easy ways to check who's been logging into your Windows PC: checking your computer's login history in Active Directory and seeing Windows logs in Event Viewer. Here we go!
MoniVisor: A PC Monitoring Tool on Windows
MoniVisor is an awesome tool made just for Windows users like you. It's not your average monitoring tool – it's designed to make keeping an eye on every login attempt on your Windows device a piece of cake.
Whether you're curious about your own login history or want to keep tabs on what others are up to, MoniVisor gives you the tools to do it hassle-free. It's like having your own security guard for a safer and simpler Windows experience. Some highlights of this PC monitoring tool is listed below:
How to track the user login history on Windows
Step 1: Download and install MoniVisor: Visit the official website and download the software on the target computer. Follow the on-screen instructions to install the program on your Windows device.
Step 2: Create an account: Register for a new account and choose a suitable plan according to your preferences.
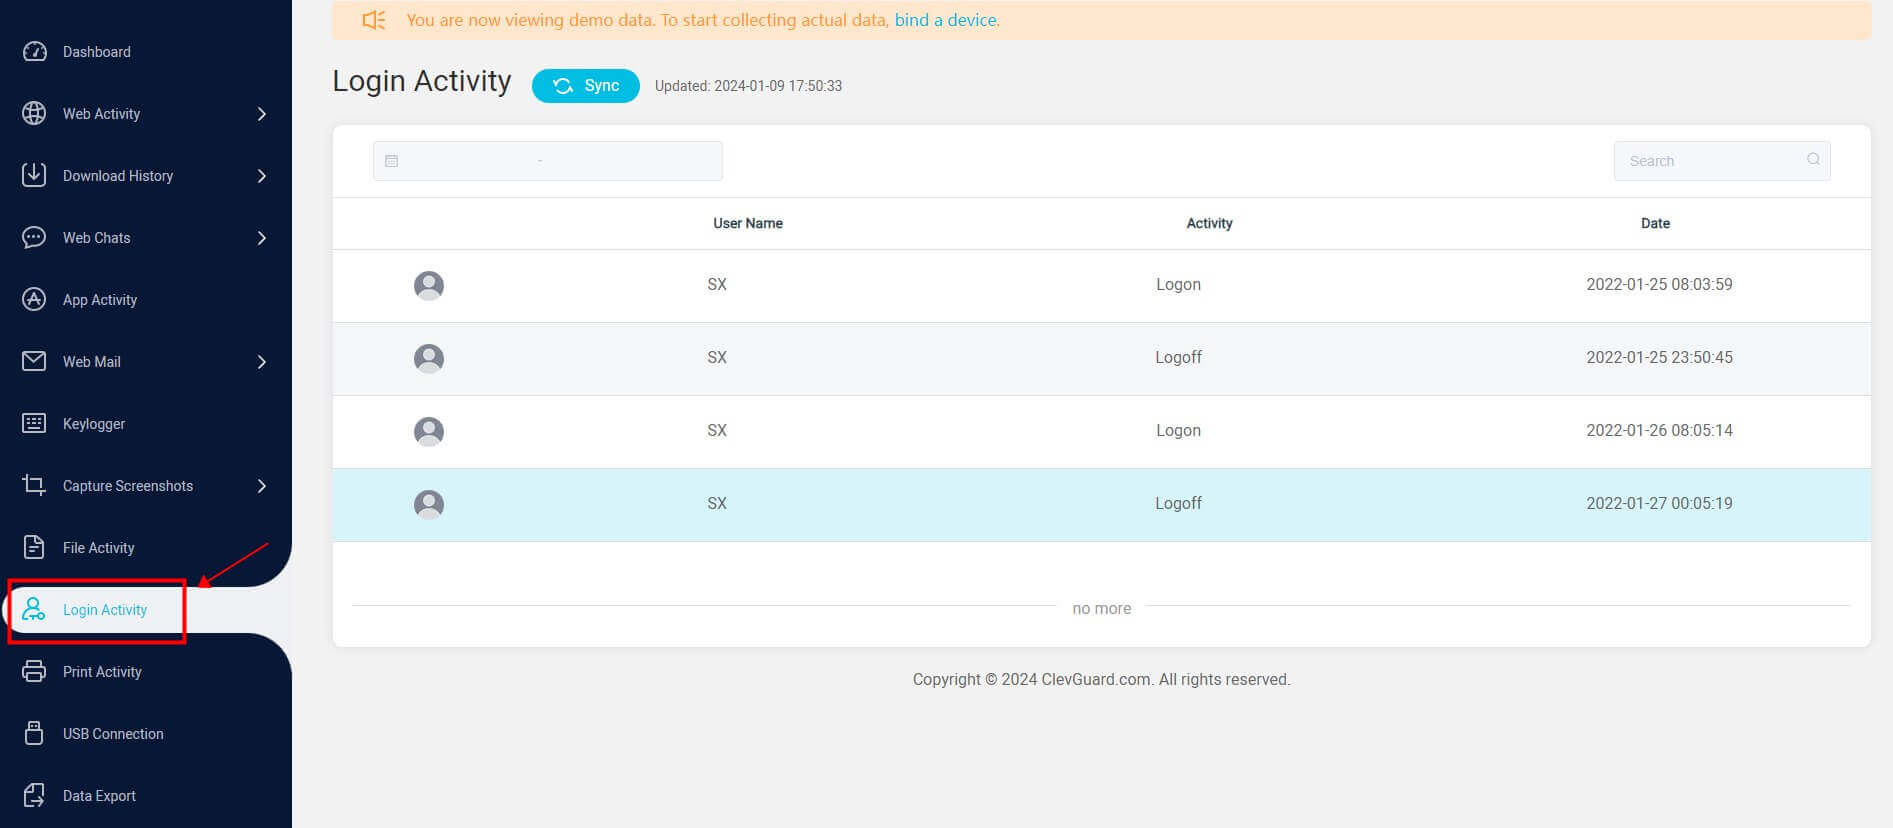
Step 3: Login to the user center: Sign in to MoniVisor’s online dashboard and choose "Login Activity" from the left menu bar. The program shows the user name, login activity, and date. Thus, you can gain insights by seeing login history on Windows computers.


This computer monitoring software can readily record every login and logoff activity without any hassle. You don’t have to go the extra mile to check the system logs or deal with the complicated data. Once installed on the target computer, the software records every file activities and computer activities automatically, and you just need to check the data in front of the desk.
How to Check Computer Login History in Active Directory
If you are using Active Directory in a networked environment, you can also check the login history of users across multiple Windows devices.
Active Directory allows you to centrally manage user accounts and access controls, making it an invaluable tool for monitoring login activities. It plays a crucial role in network management and security within a Windows environment.
To check computer login history in Active Directory, follow these steps:
Step 1: Access the Active Directory Users and Computers Management Console: On a domain controller or a computer with the Remote Server Administration Tools (RSAT) installed, launch the Active Directory Users and Computers management console.
Step 2: Navigate to the User Account: Locate the user account for which you want to check the login history within the Active Directory Users and Computers management console.
Step 3: View the User Properties: Right-click on the user account and select "Properties" from the context menu.
Step 4: Check the "Account" tab: Within the user properties window, navigate to the "Account" tab. Here, you will find information related to the user's login history, including the last login time and date.
By following these steps, you can easily check the login history of a user in Active Directory. This feature is particularly useful in networked environments where multiple users have access to various Windows devices.
How to Access Windows Logs in Event Viewer
Another method to check computer login history is by accessing the Windows logs in the Event Viewer.
The Event Viewer is a built-in Windows tool that allows you to view and analyze system events, including login activities. To access the Windows logs in Event Viewer and check the login history, follow these steps:
Step 1: Open Event Viewer: Press the Windows key + R to open the “Run dialog box”. Type "eventvwr.msc" and press “Enter”. Optionally, you can press the Windows key + X to open the “Power User” menu and then select "Event Viewer" from the list. These two ways can both open the Event Viewer.
Step 2: Navigate to the Security Logs: In the Event Viewer window, expand the "Windows Logs" folder on the left sidebar and double-click on "Security". This will display the security logs, which contain login history information.
Step 3: Filter the Event Logs: In the right panel of the Event Viewer window, click on "Filter Current Log". In the "Filter" window, specify the necessary filter criteria, such as the Event ID for login events (Event ID 4624) or logoff events (Events ID 4634).
Step 4: See login history: After applying the appropriate filters, you will be able to view the login history events in the Event Viewer. Look for entries with the Event ID 4624, which indicate successful login events. If needed, you can export log data by right-clicking on the Security log and selecting "Save All Events As..." Choose a file format and save the log for future reference.
Conclusion
Keeping a close eye on your Windows login history is crucial for protecting your computer's security and privacy. By regularly checking and managing login activities, you can quickly spot any unauthorized access and take action. This simple practice is essential for maintaining a secure computing environment and safeguarding your personal information.


